PROJECT DETAILS
CRAFTING THE LIGHT
BEFORE AND AFTER
Transformation made visible.
TOOLS
Equipment List
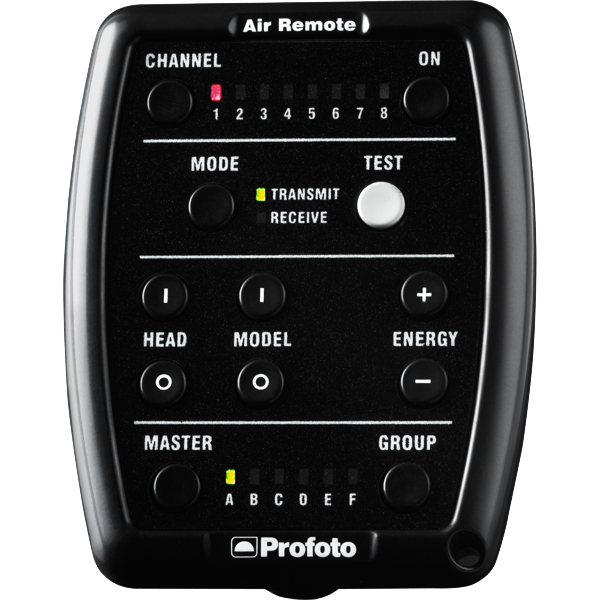
Profoto Air Remote
A wireless transmitter that mounts on the camera’s hot shoe to control Profoto lights remotely. Supports TTL, manual power adjustment, and high-speed sync. Why it’s used: Enables precise, cable-free control of flash settings from the camera position, streamlining workflow and allowing quick lighting adjustments during a shoot.
A wireless transmitter that mounts on the camera’s hot shoe to control Profoto lights remotely. Supports TTL, manual power adjustment, and high-speed sync. Why it’s used: Enables precise, cable-free control of flash settings from the camera position, streamlining workflow and allowing quick lighting adjustments during a shoot.
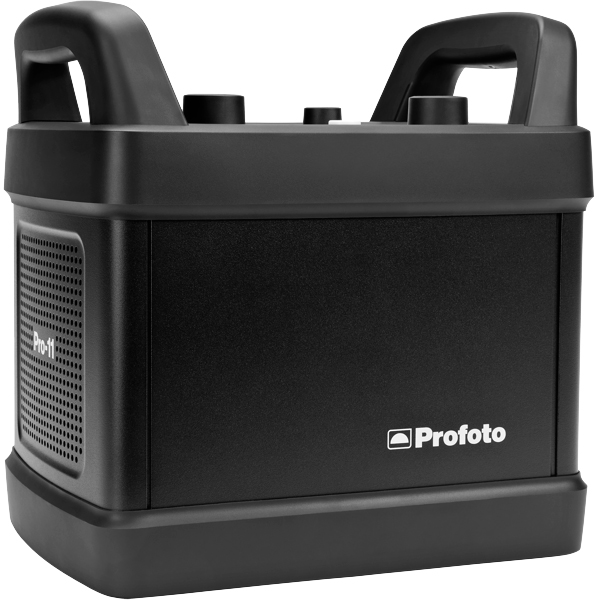
Profoto Pro 11
A top-tier 2400 Ws studio generator offering ultra-fast flash durations, short recycle times, and exceptional color consistency. Features wireless control and AirX connectivity for remote operation.
Why it’s used: Delivers unmatched speed, power, and reliability for high-end fashion, beauty, and commercial shoots where precision and performance are critical.
Profoto ProHead
A high-performance flash head designed for use with Profoto’s Pro-series generators. Built for durability, fast recycling, and consistent color output, even at high power.
Why it’s used: Delivers powerful, reliable lighting for demanding studio and location work, supporting a wide range of Profoto modifiers for maximum creative control.
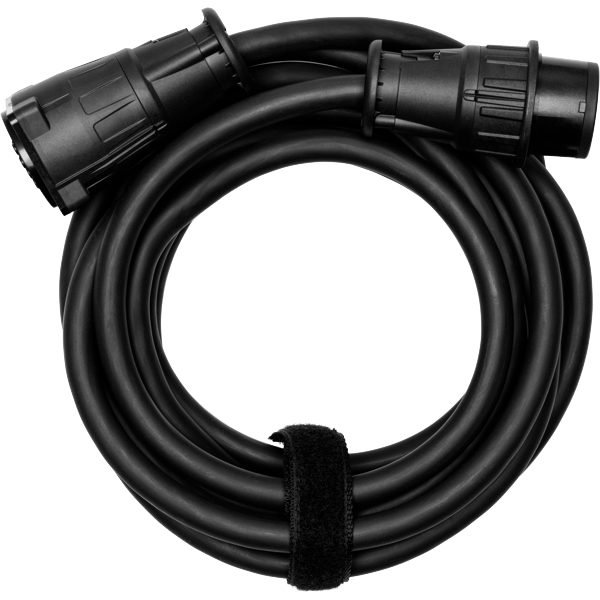
Profoto Extension Cable
A heavy-duty cable that extends the distance between a Profoto generator and its flash head. Designed to handle high power loads without loss of performance.
Why it’s used: Provides flexibility in light placement on large sets or challenging locations, allowing equipment to be positioned safely and creatively without being limited by generator proximity.
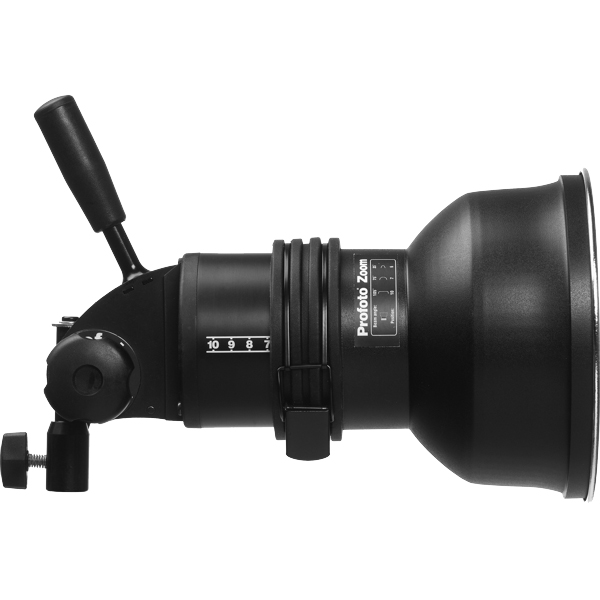
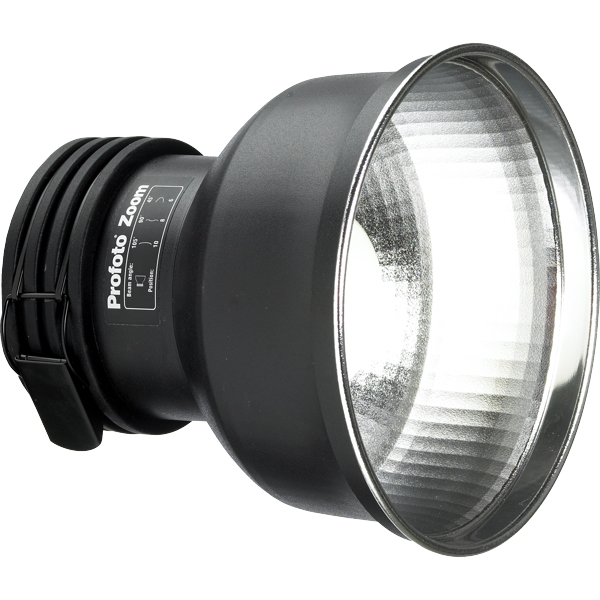
Profoto Zoom Reflector
A versatile hard light modifier for Profoto flash heads, featuring an adjustable zoom function to change the beam spread from wide to focused.
Why it’s used: Provides crisp, punchy light with controllable spread, making it suitable for everything from general illumination to accent lighting in both studio and location work.
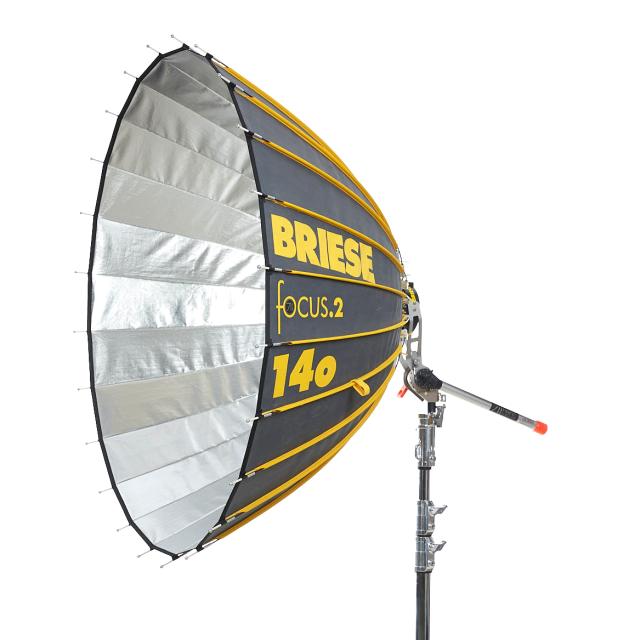
Briese Focus 140 Profoto Mount
A parabolic umbrella-style reflector with a 140 cm diameter, engineered for precise light focus and exceptional wrap. The Profoto mount allows direct use with Profoto flash heads.
Why it’s used: Produces a uniquely crisp yet soft light with beautiful fall-off, ideal for high-end fashion and beauty photography where control, depth, and texture are essential.
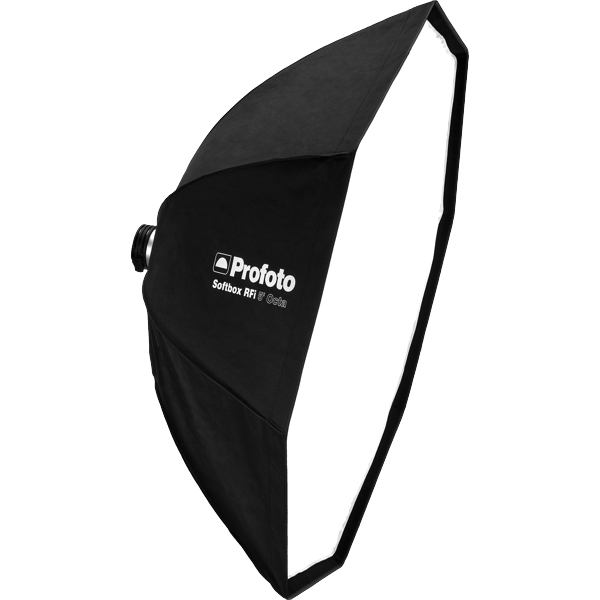
Profoto RFI Softbox Octa 5"(150cm)
A large, 150 cm octagonal softbox that produces broad, soft, and even illumination with natural-looking round catchlights. Compatible with Profoto flashes via the RFi speedring.
Why it’s used: Ideal for full-body fashion, group portraits, or beauty work where a flattering, wraparound light and gentle shadow transitions are essential.
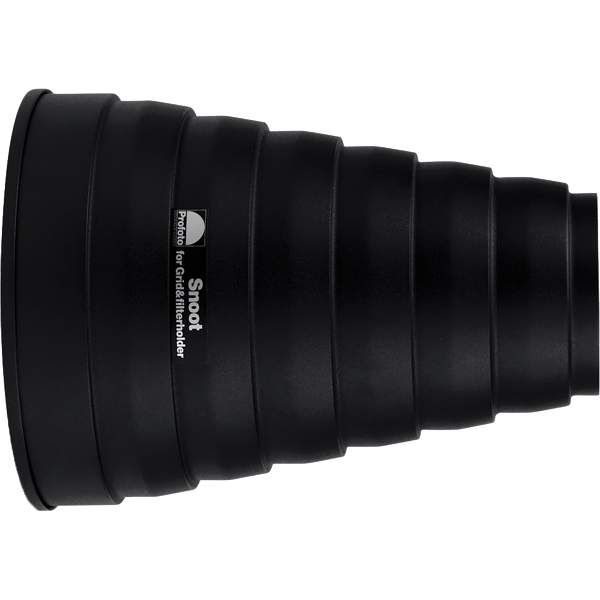
Profoto Snoot
A conical light modifier that narrows a flash head’s beam into a tight, focused spot. Easily attaches to Profoto heads for quick setup.
Why it’s used: Creates a concentrated beam for highlighting specific areas, adding accents, or producing dramatic lighting effects with strong contrast and minimal spill.
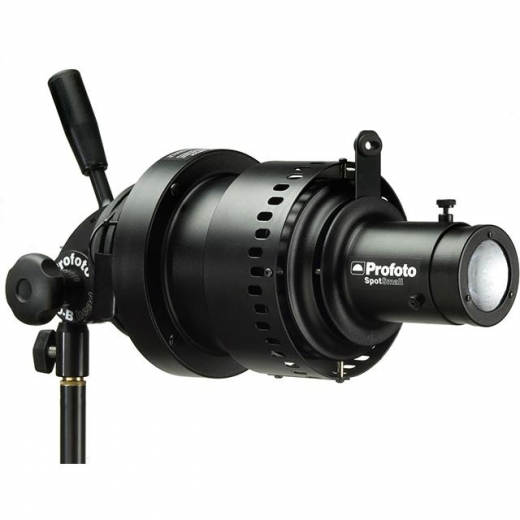
Profoto Zoom Spot
A projection attachment for Profoto flash heads that uses lenses to focus and shape the light beam with precision. Compatible with gobos for pattern projection.
Why it’s used: Allows highly controlled lighting effects, from sharp-edged beams to textured patterns, perfect for adding drama, highlighting details, or creating creative backgrounds in fashion and editorial shoots.
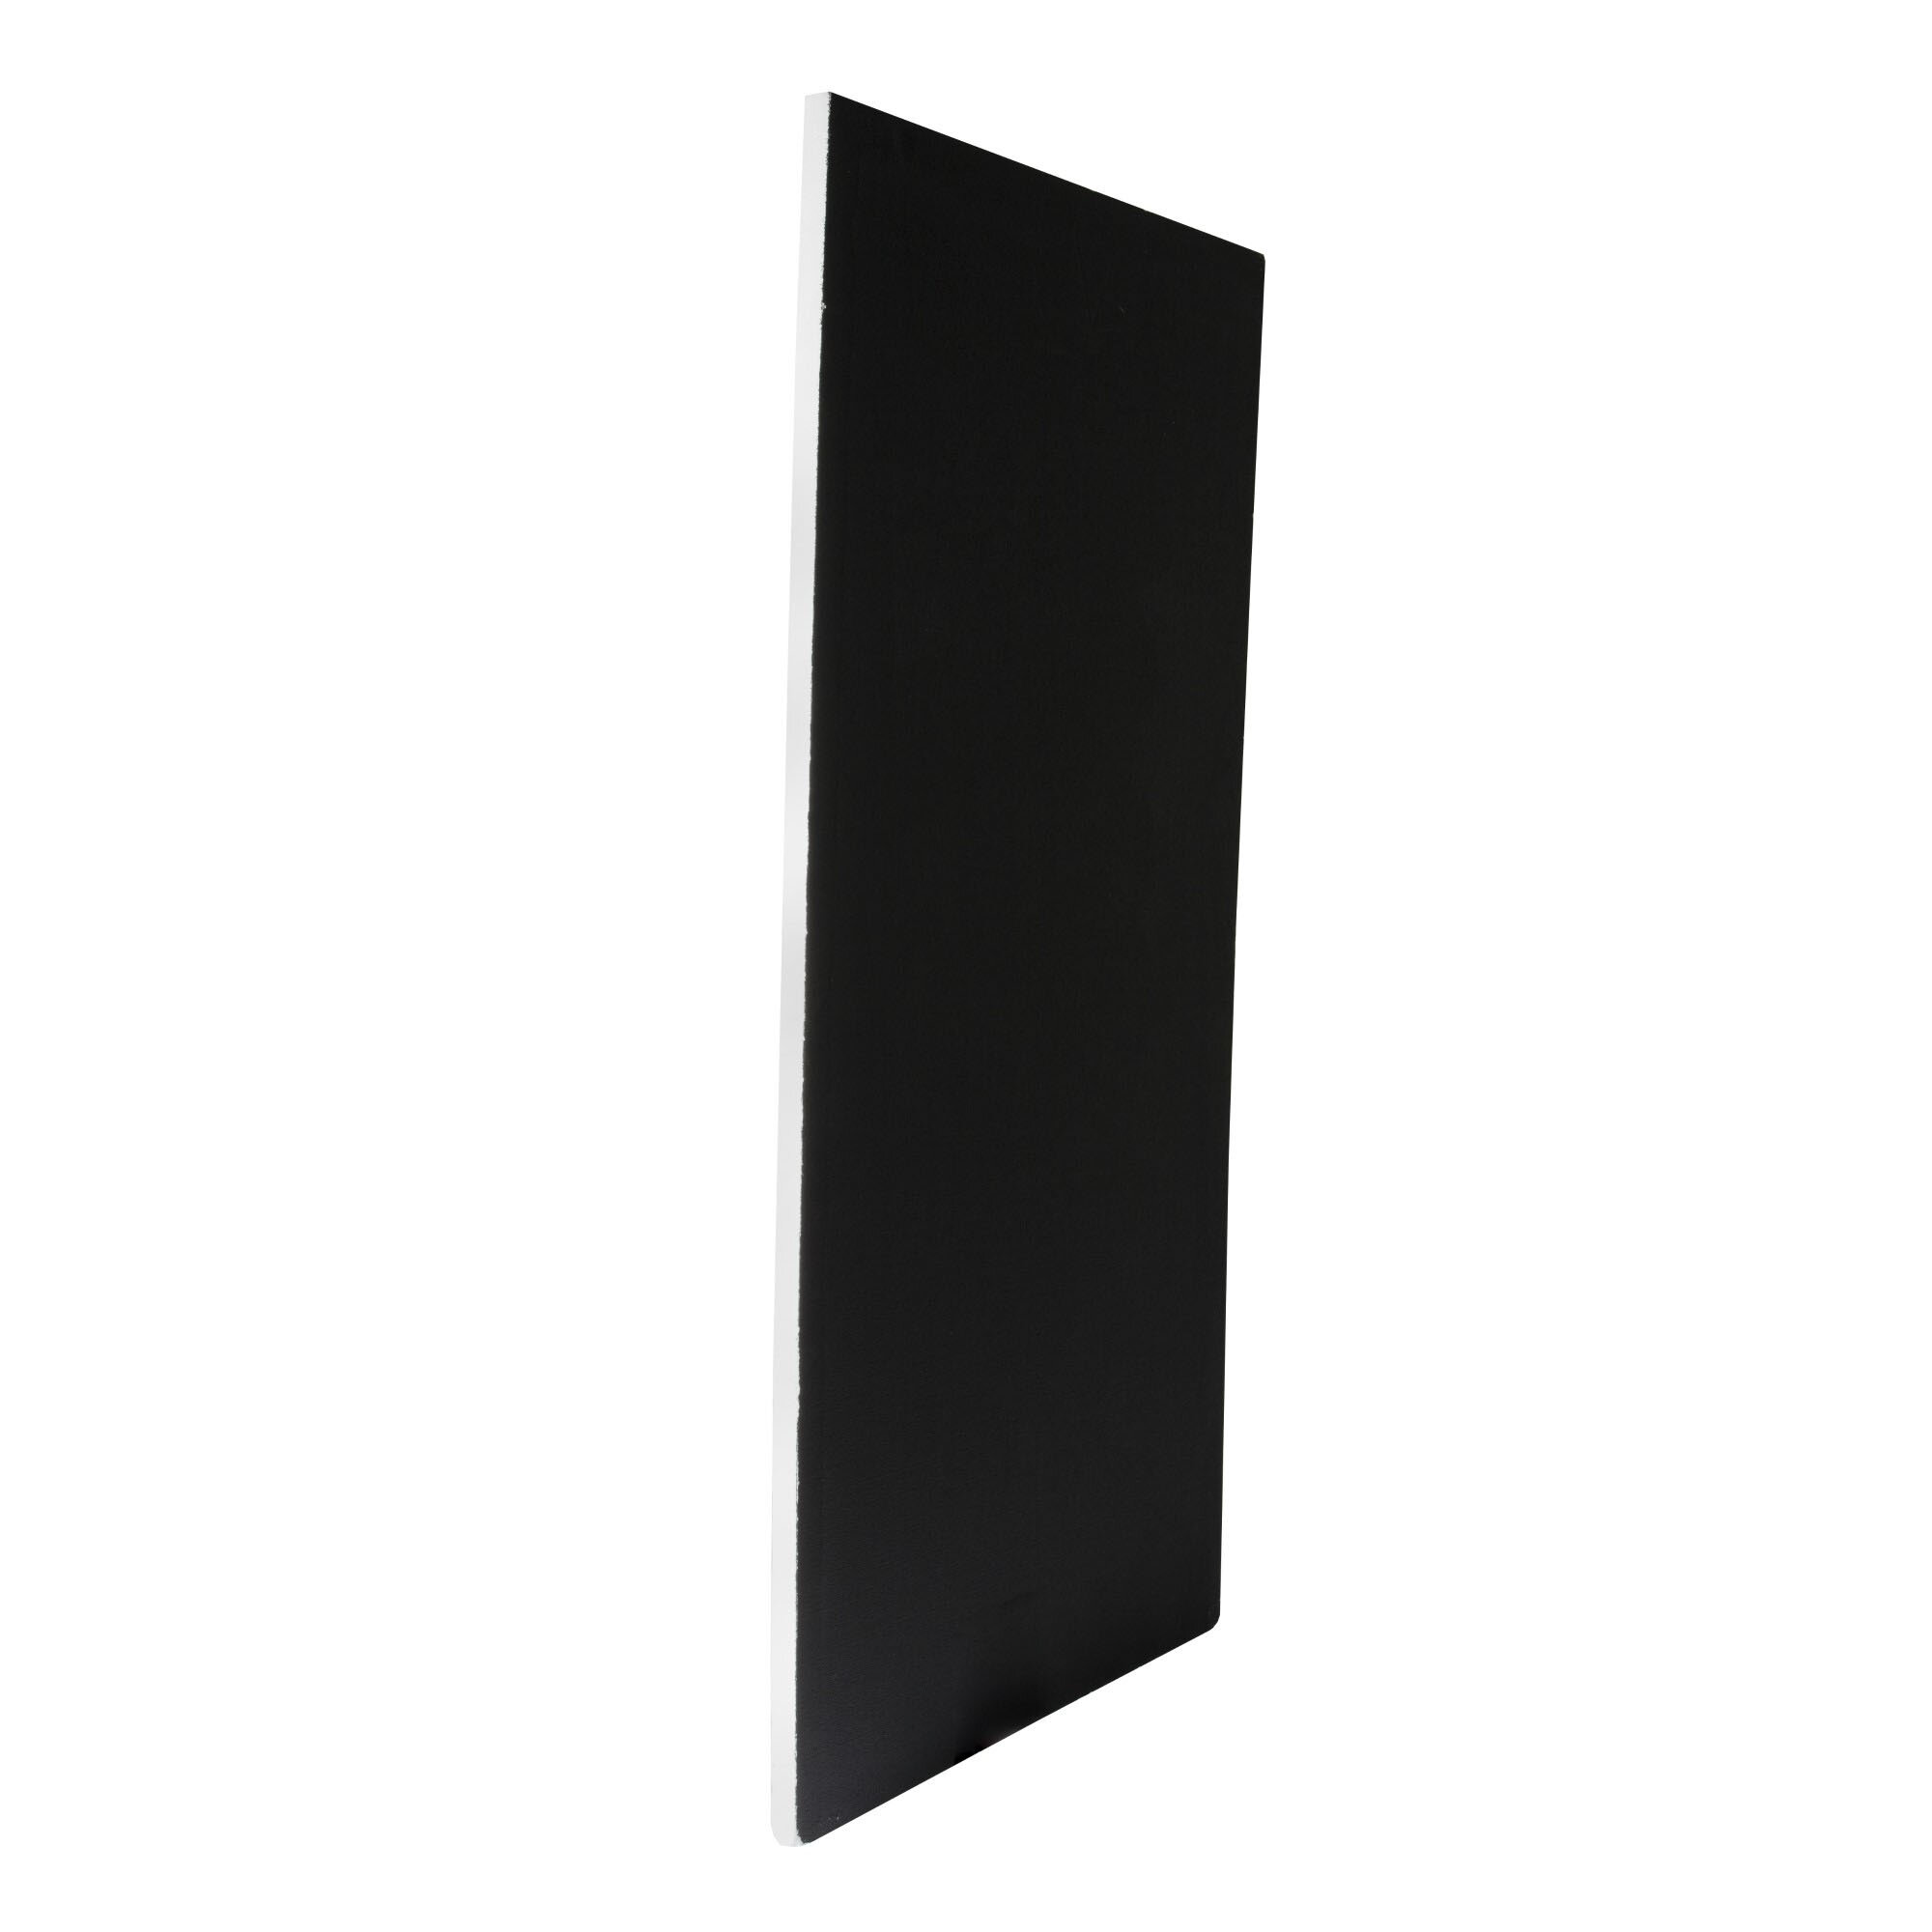
Poly Board Black Large
A large, rigid panel made from black foam core or similar material, used to block or absorb light. Typically lightweight but sturdy enough for repeated use on set.
Why it’s used: Reduces light spill, deepens shadows, and increases contrast by preventing unwanted reflections. Commonly used in pairs to create controlled, moody lighting setups.
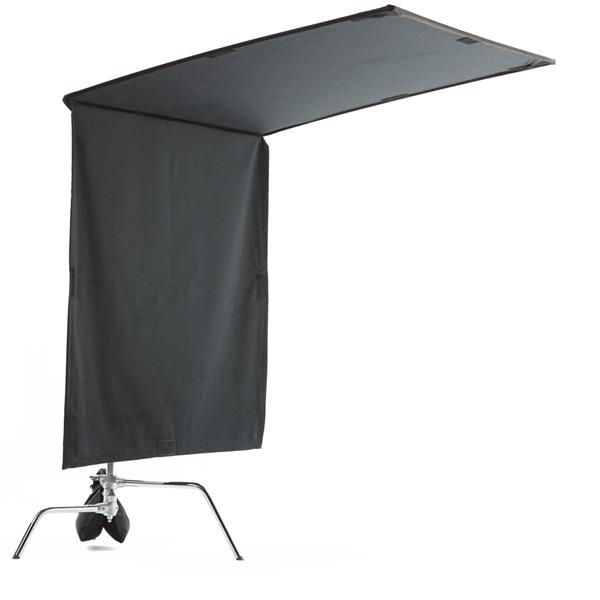
Floppy Flag
A larger black flag with an extra hinged flap of fabric that can be unfolded to double its size. Mounted on a stand or grip arm for flexible light control.
Why it’s used: Offers the same light-blocking function as a standard flag but with extra coverage when needed, making it ideal for blocking strong light sources or creating large shadow areas on set.
Get your full EQ list here

Project Intro
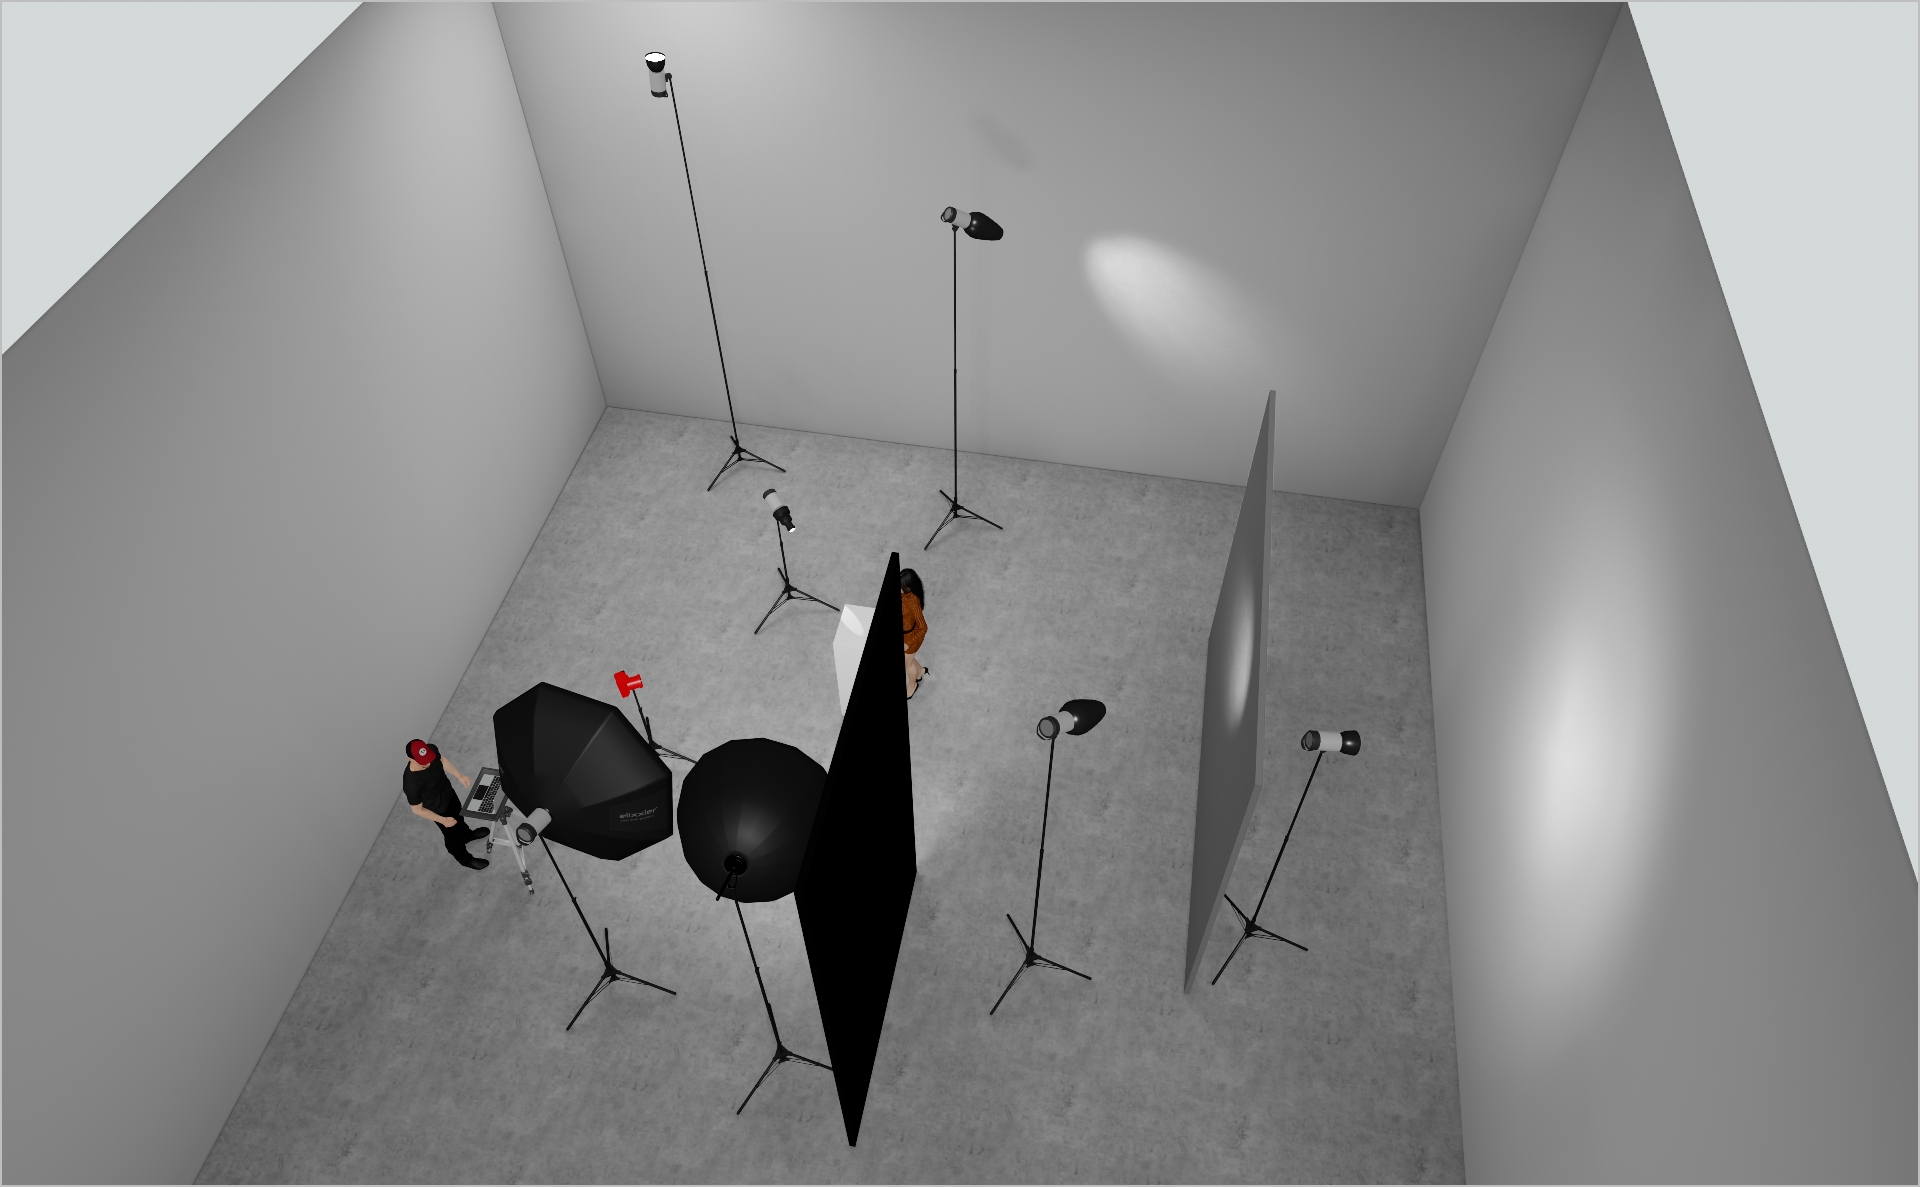
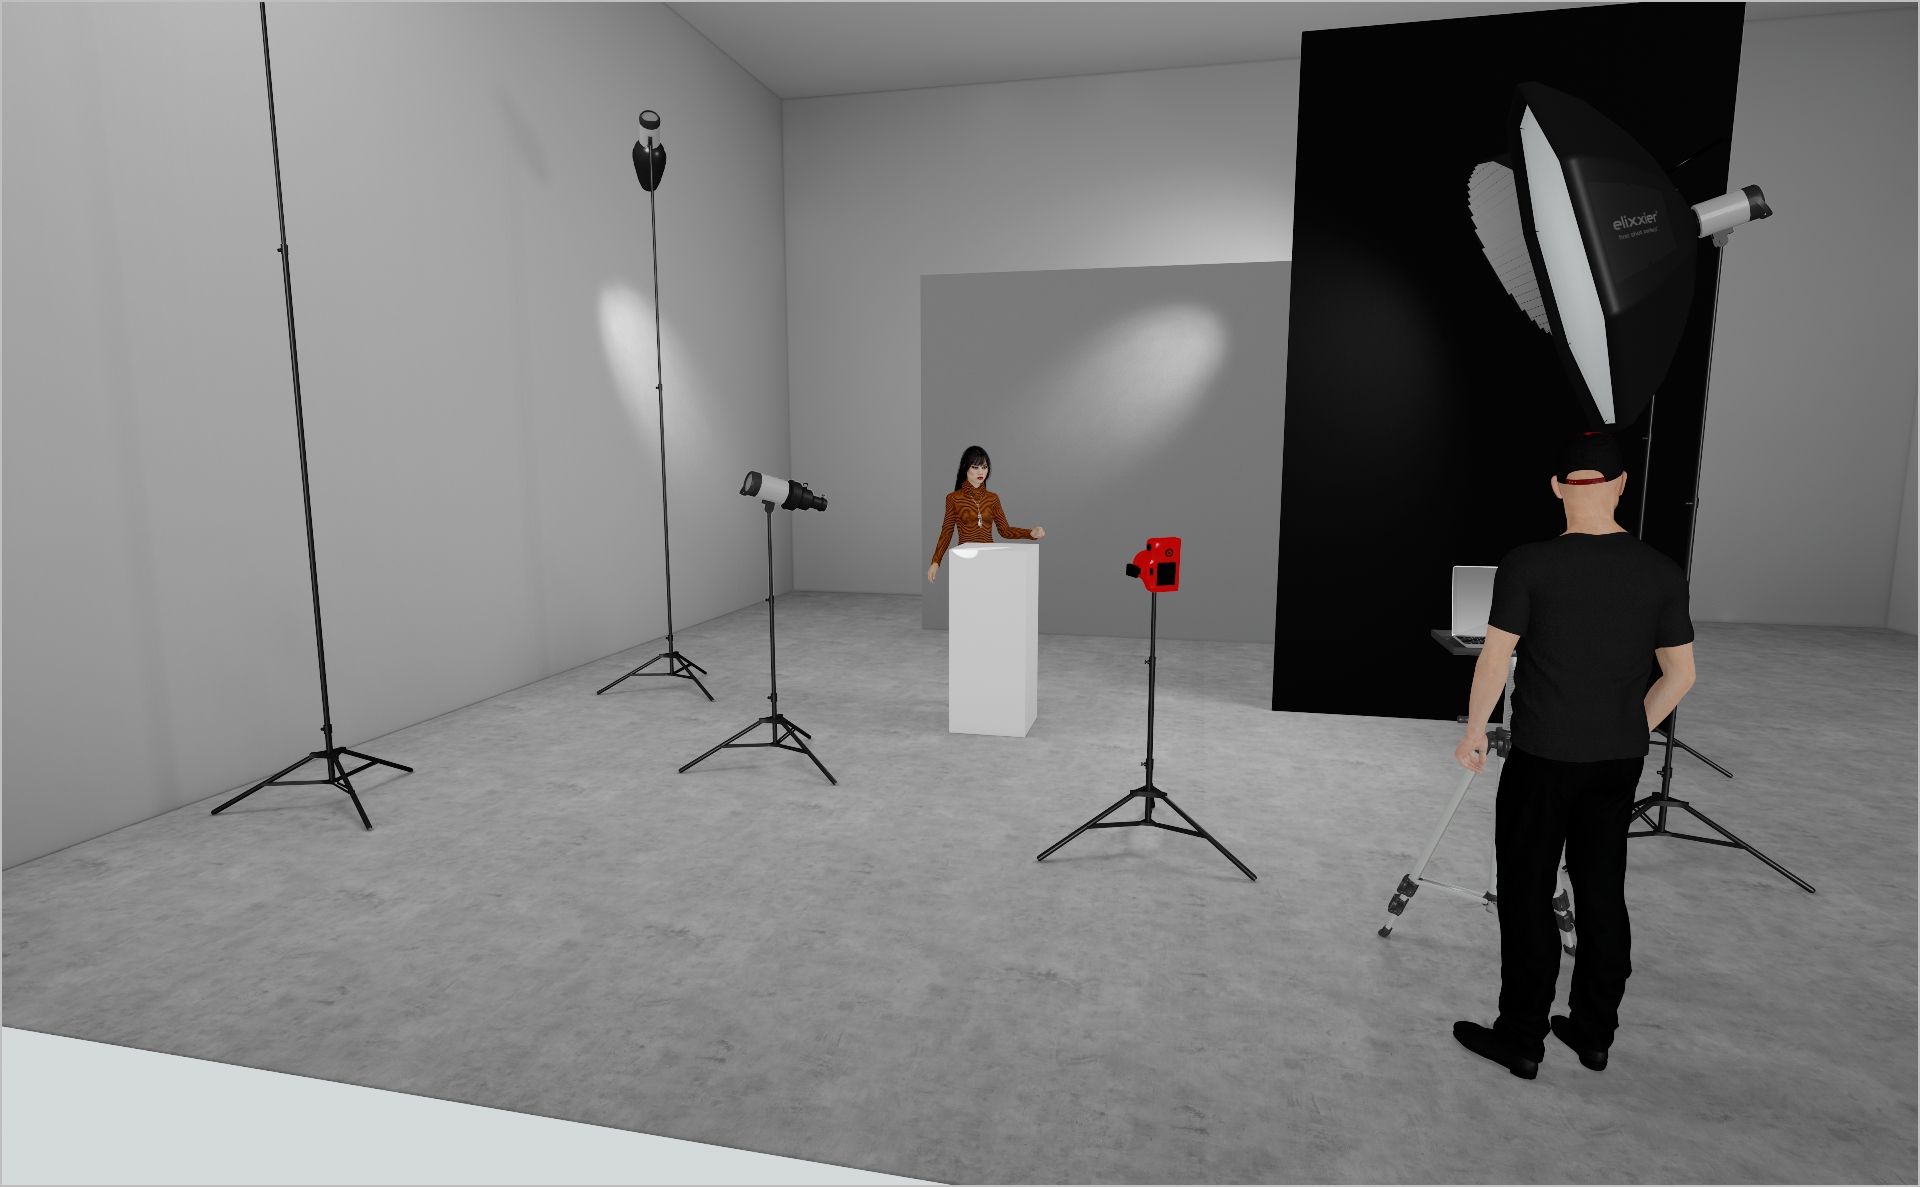
In this PRADA beauty campaign the main element is the lipstick. The goal of this setup is to create depth and atmosphere within the set and to highlight the product as well as getting a smooth, glowy light on the model.
STEP 1
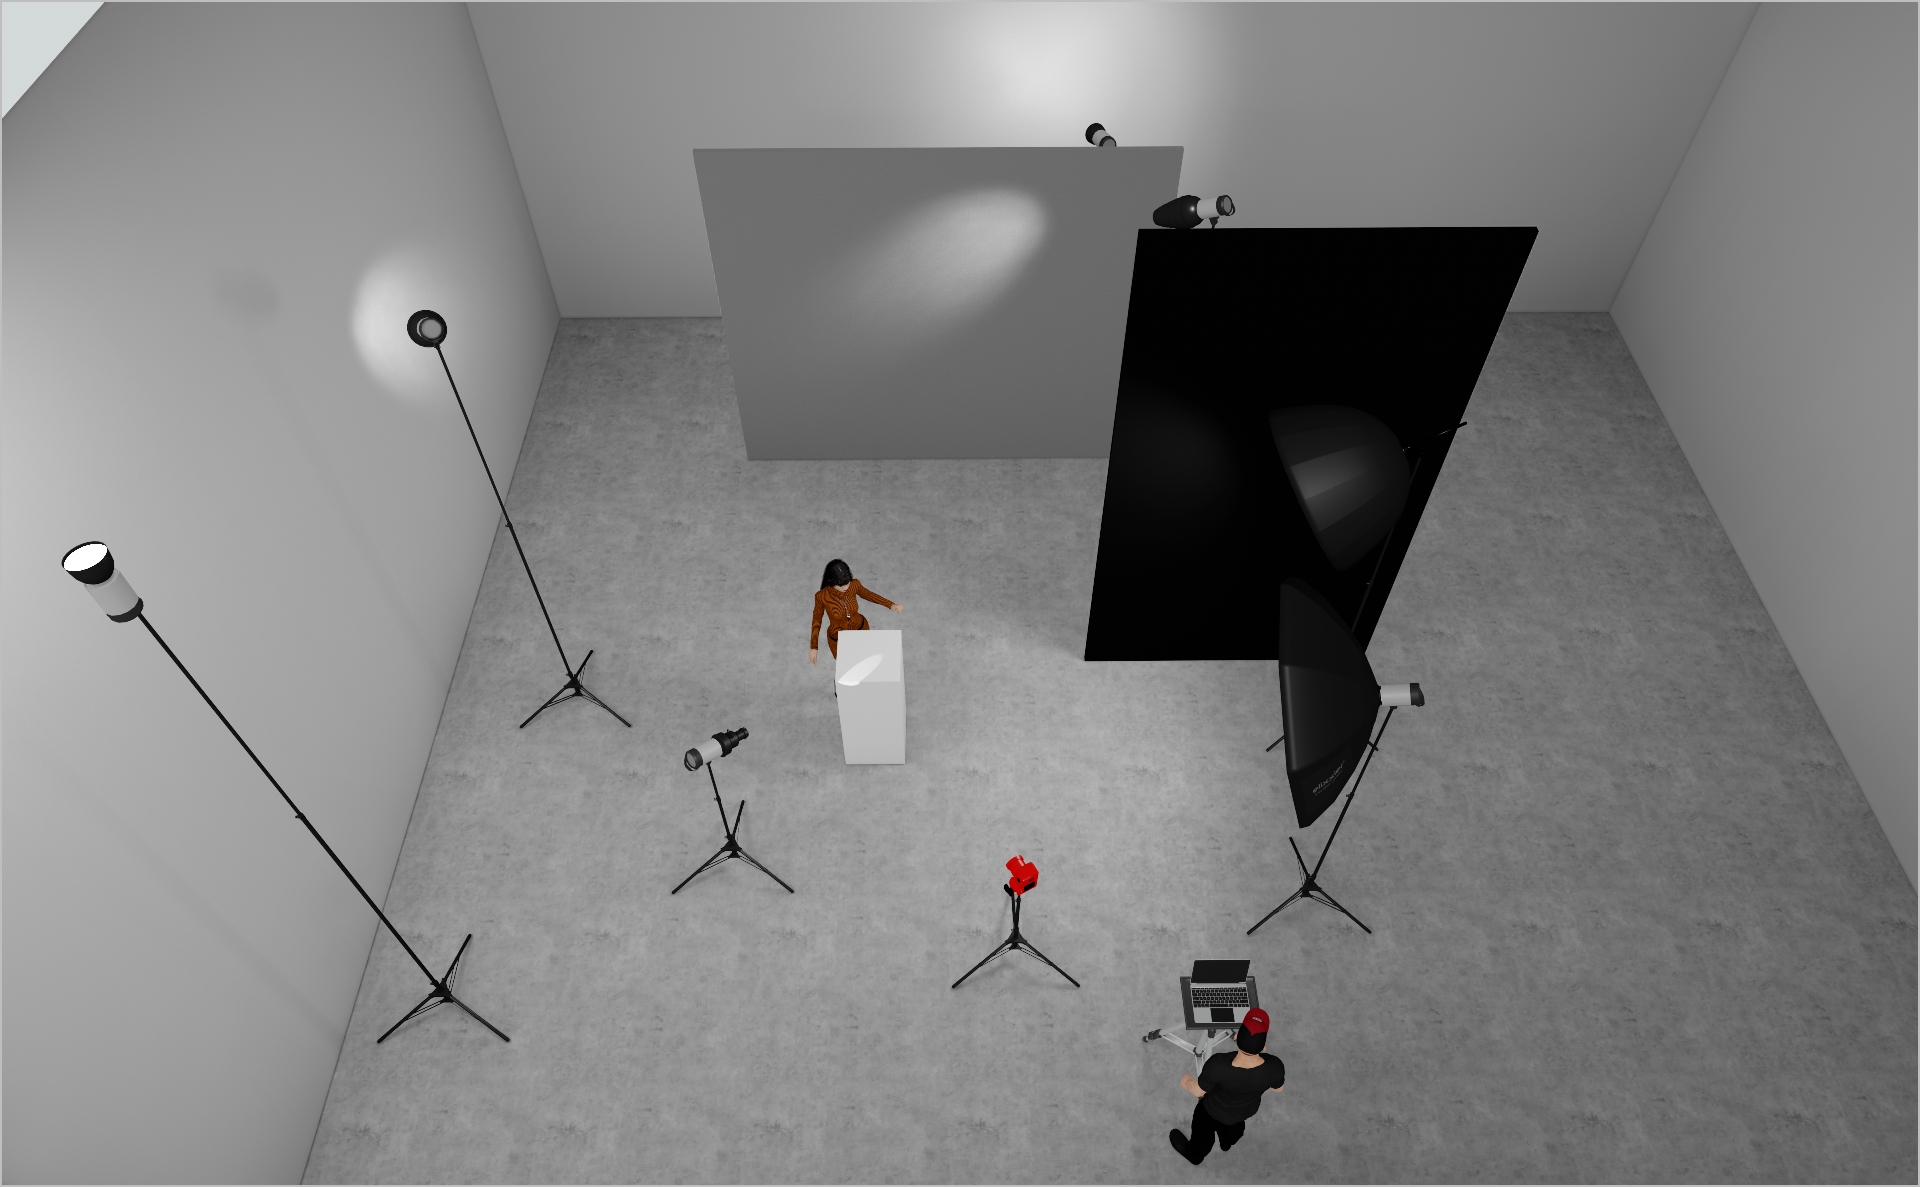
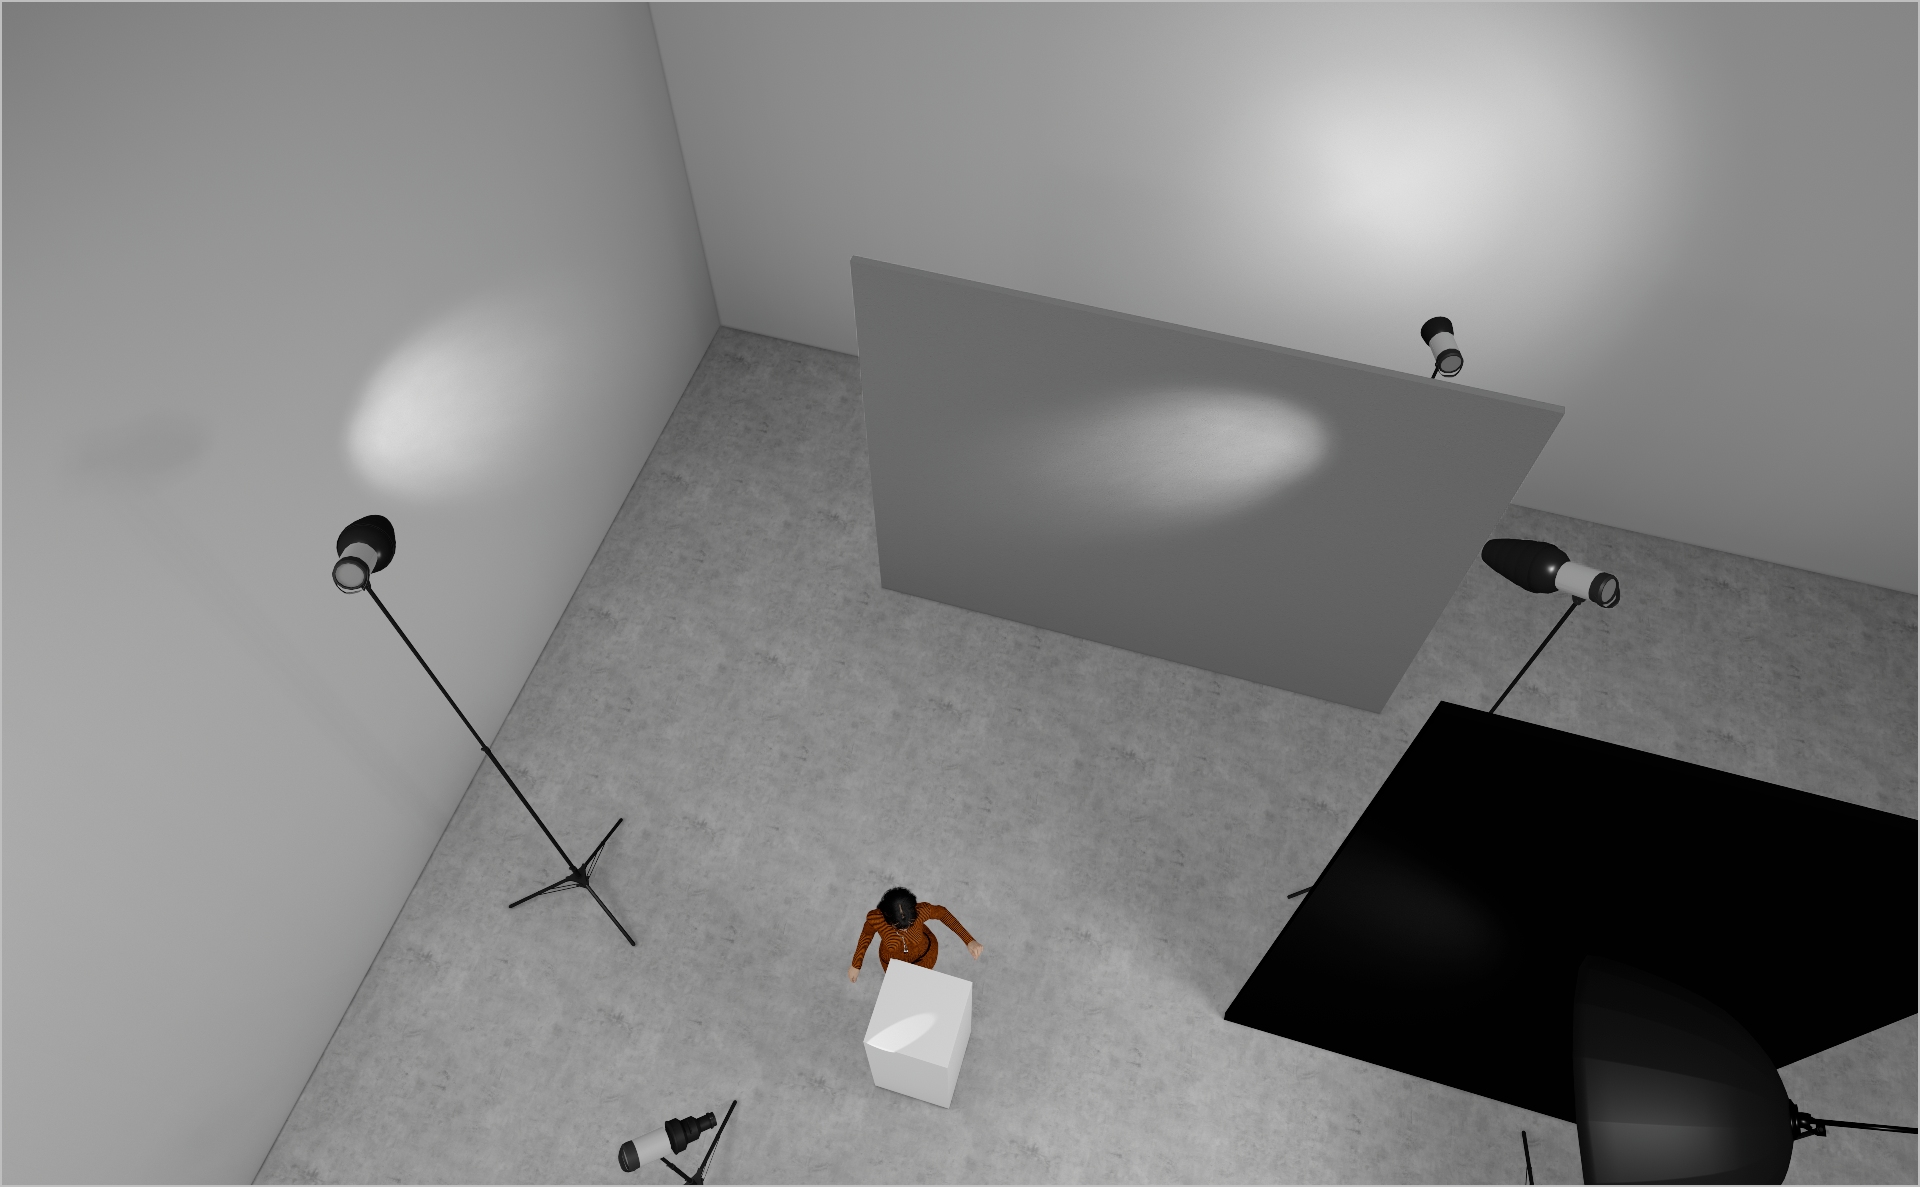
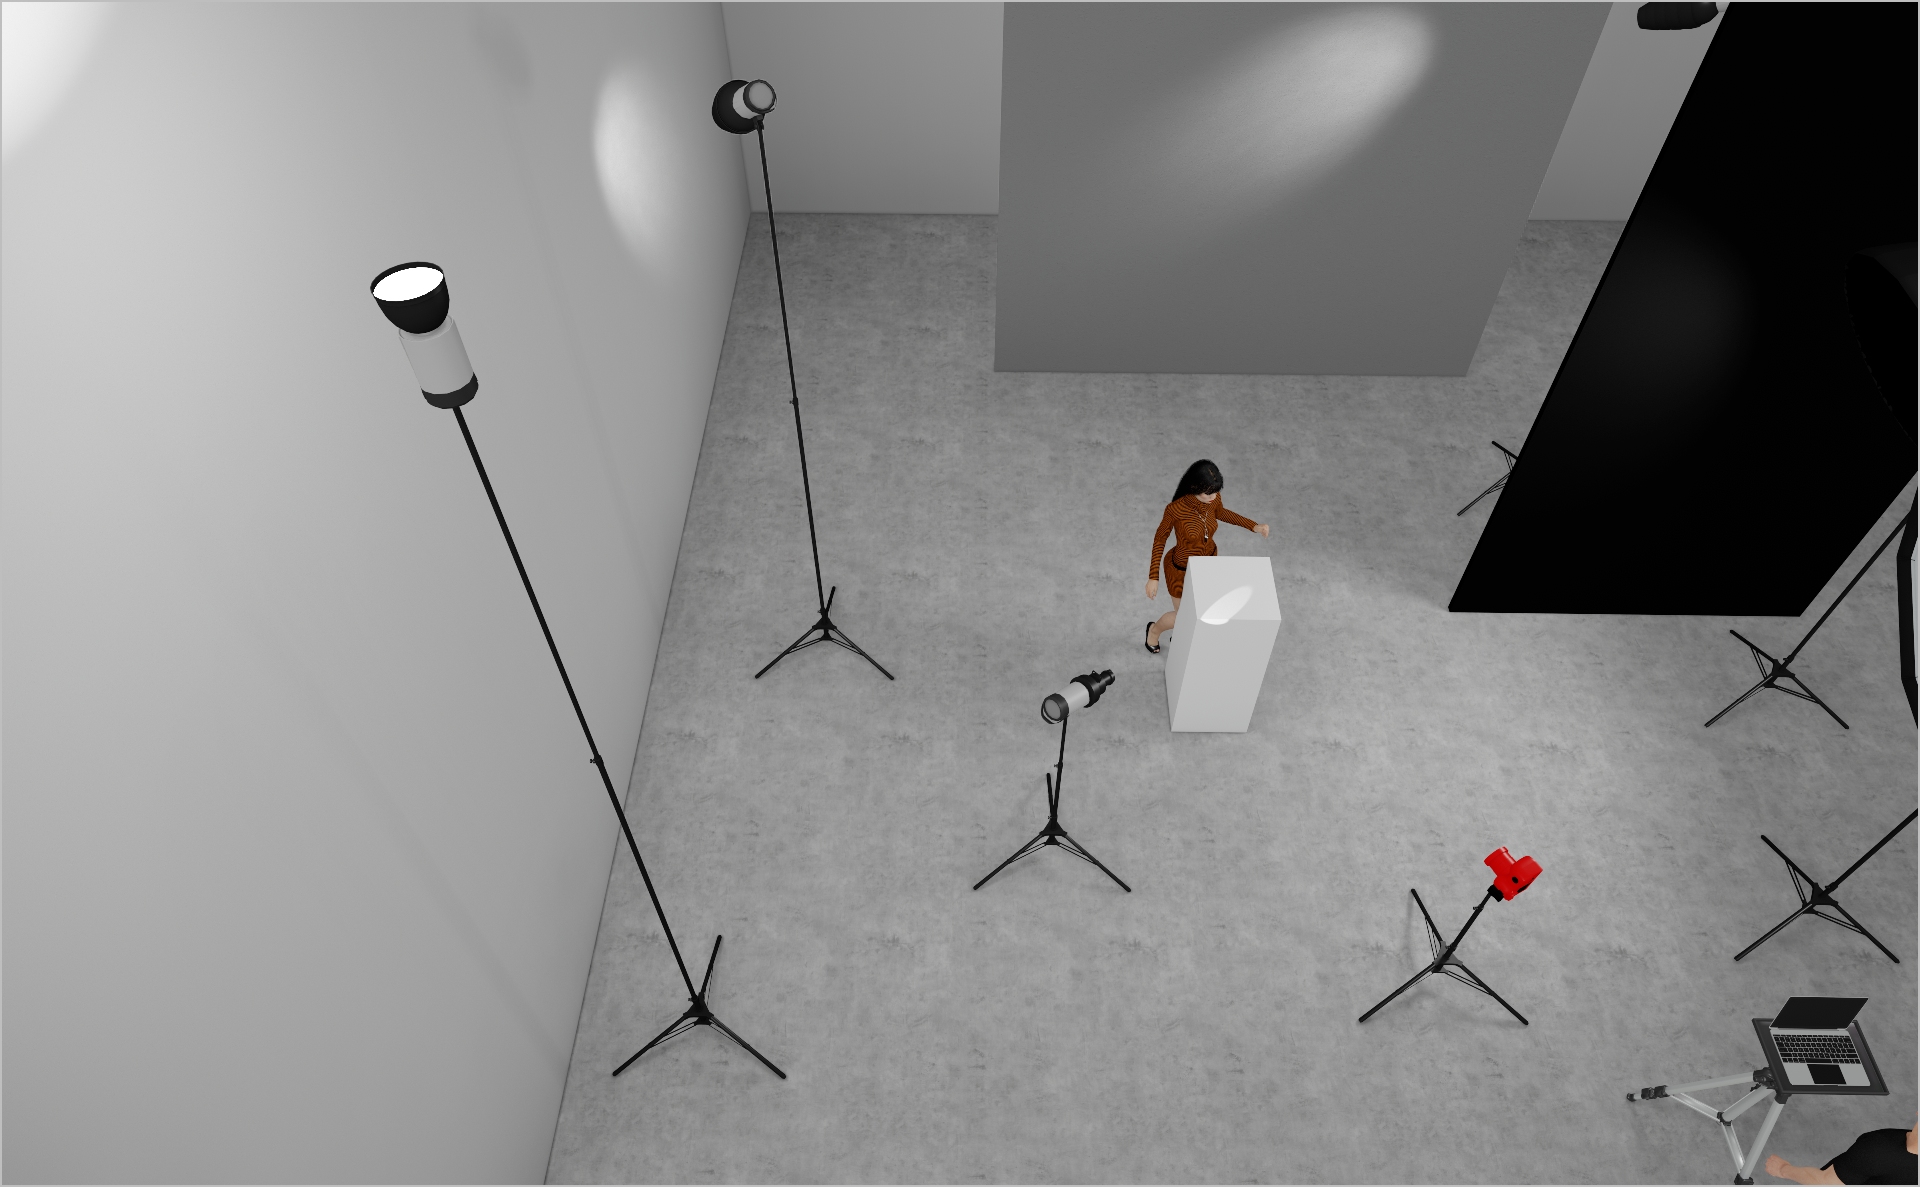
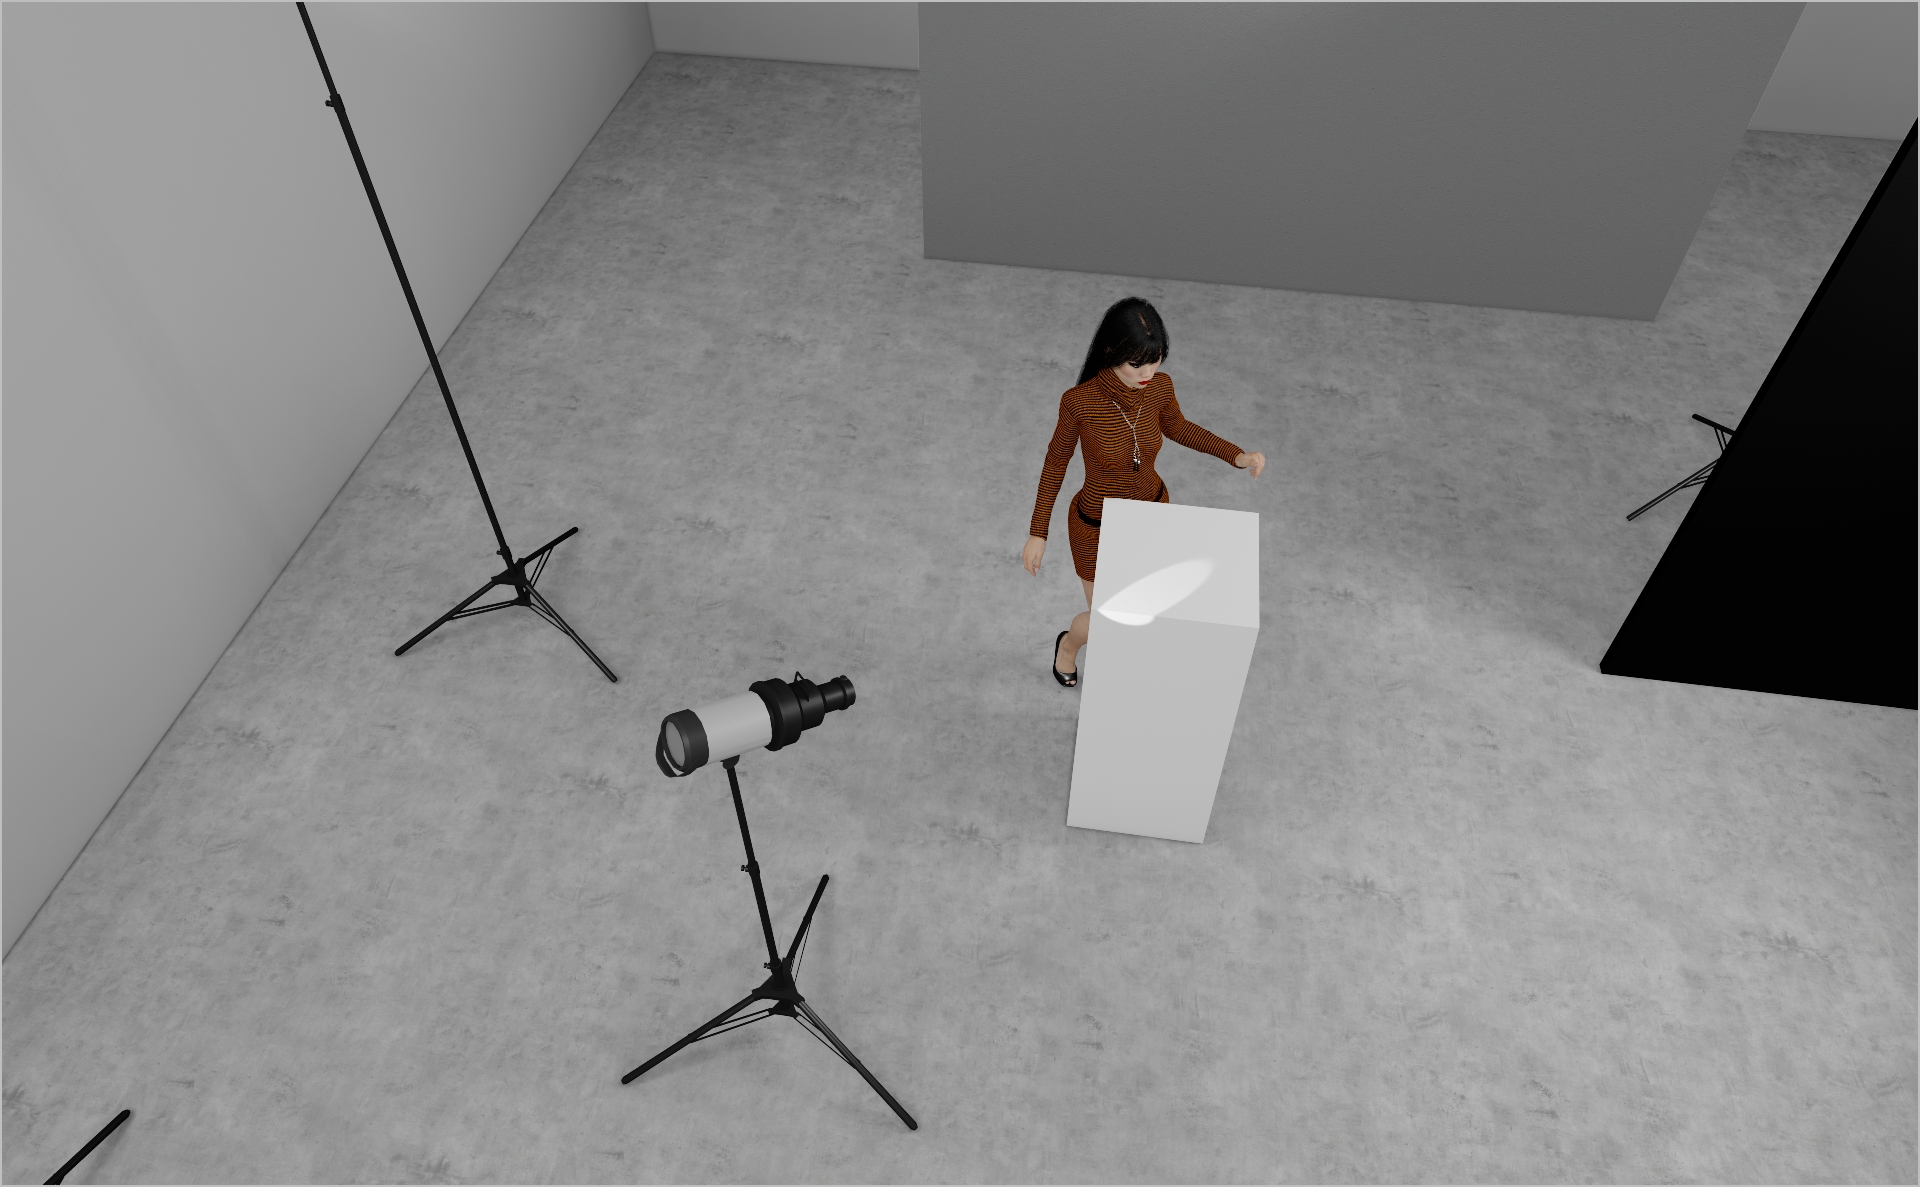
- Assemble your key set element: position a single wall panel directly behind the model in a corner to introduce depth and layering.
- Use the natural junction of the two walls to guide the eye and create atmosphere.
- This layering technique can be applied to any environment—simply adapt your primary panel or backdrop placement to craft depth in your composition.
STEP 2
- Mount a Profoto ProHead with Zoom Reflector behind the set-build wall to spill subtle light into the left corner. Start at Power 5.0 and adjust.
- Add a Profoto ProHead with Snoot on the right side, aiming at the wall for a smooth light fall-off. Start at Power 5.0.
- Place another Profoto ProHead with Snoot on the left side, pointing at the left wall for an additional depth-enhancing accent. Start at Power 5.0.
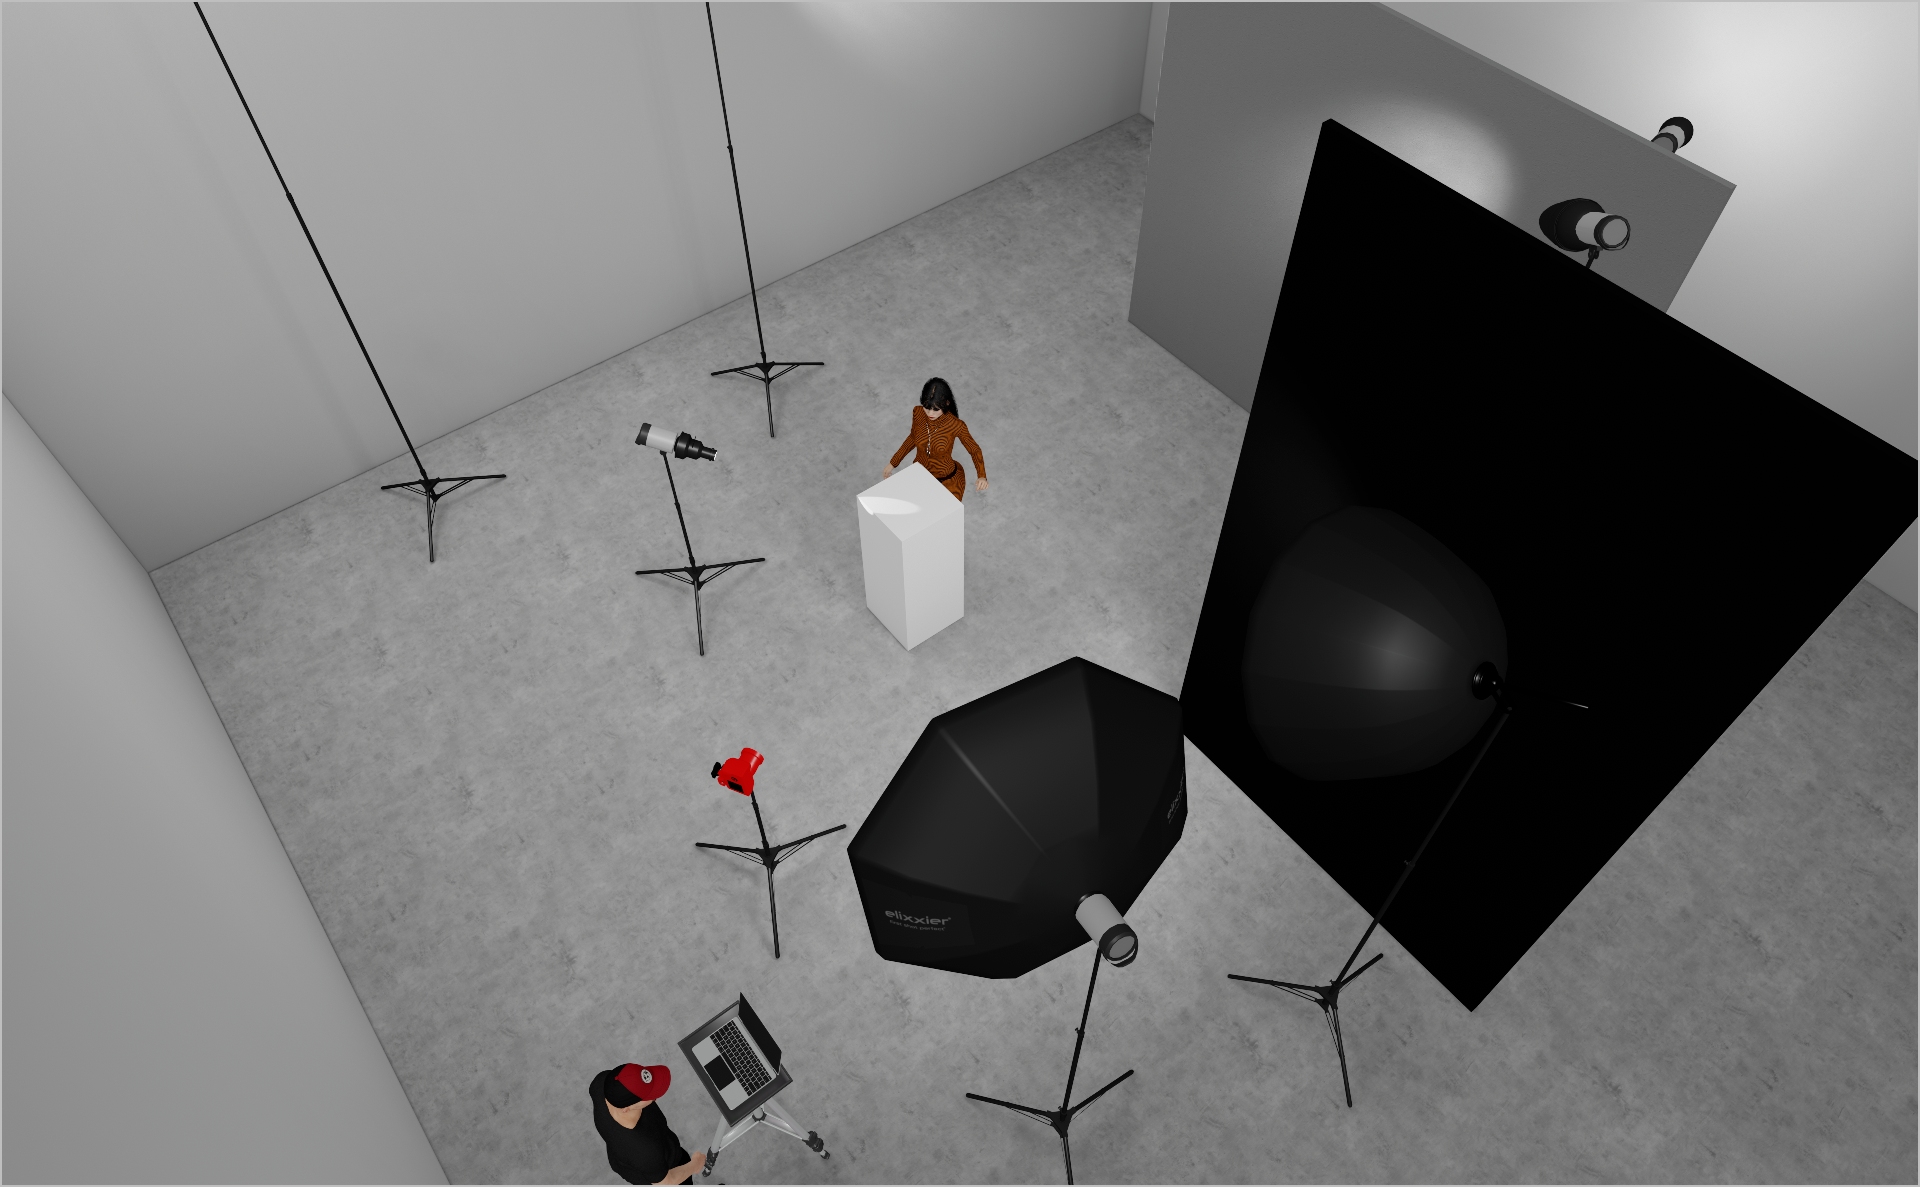
STEP 3
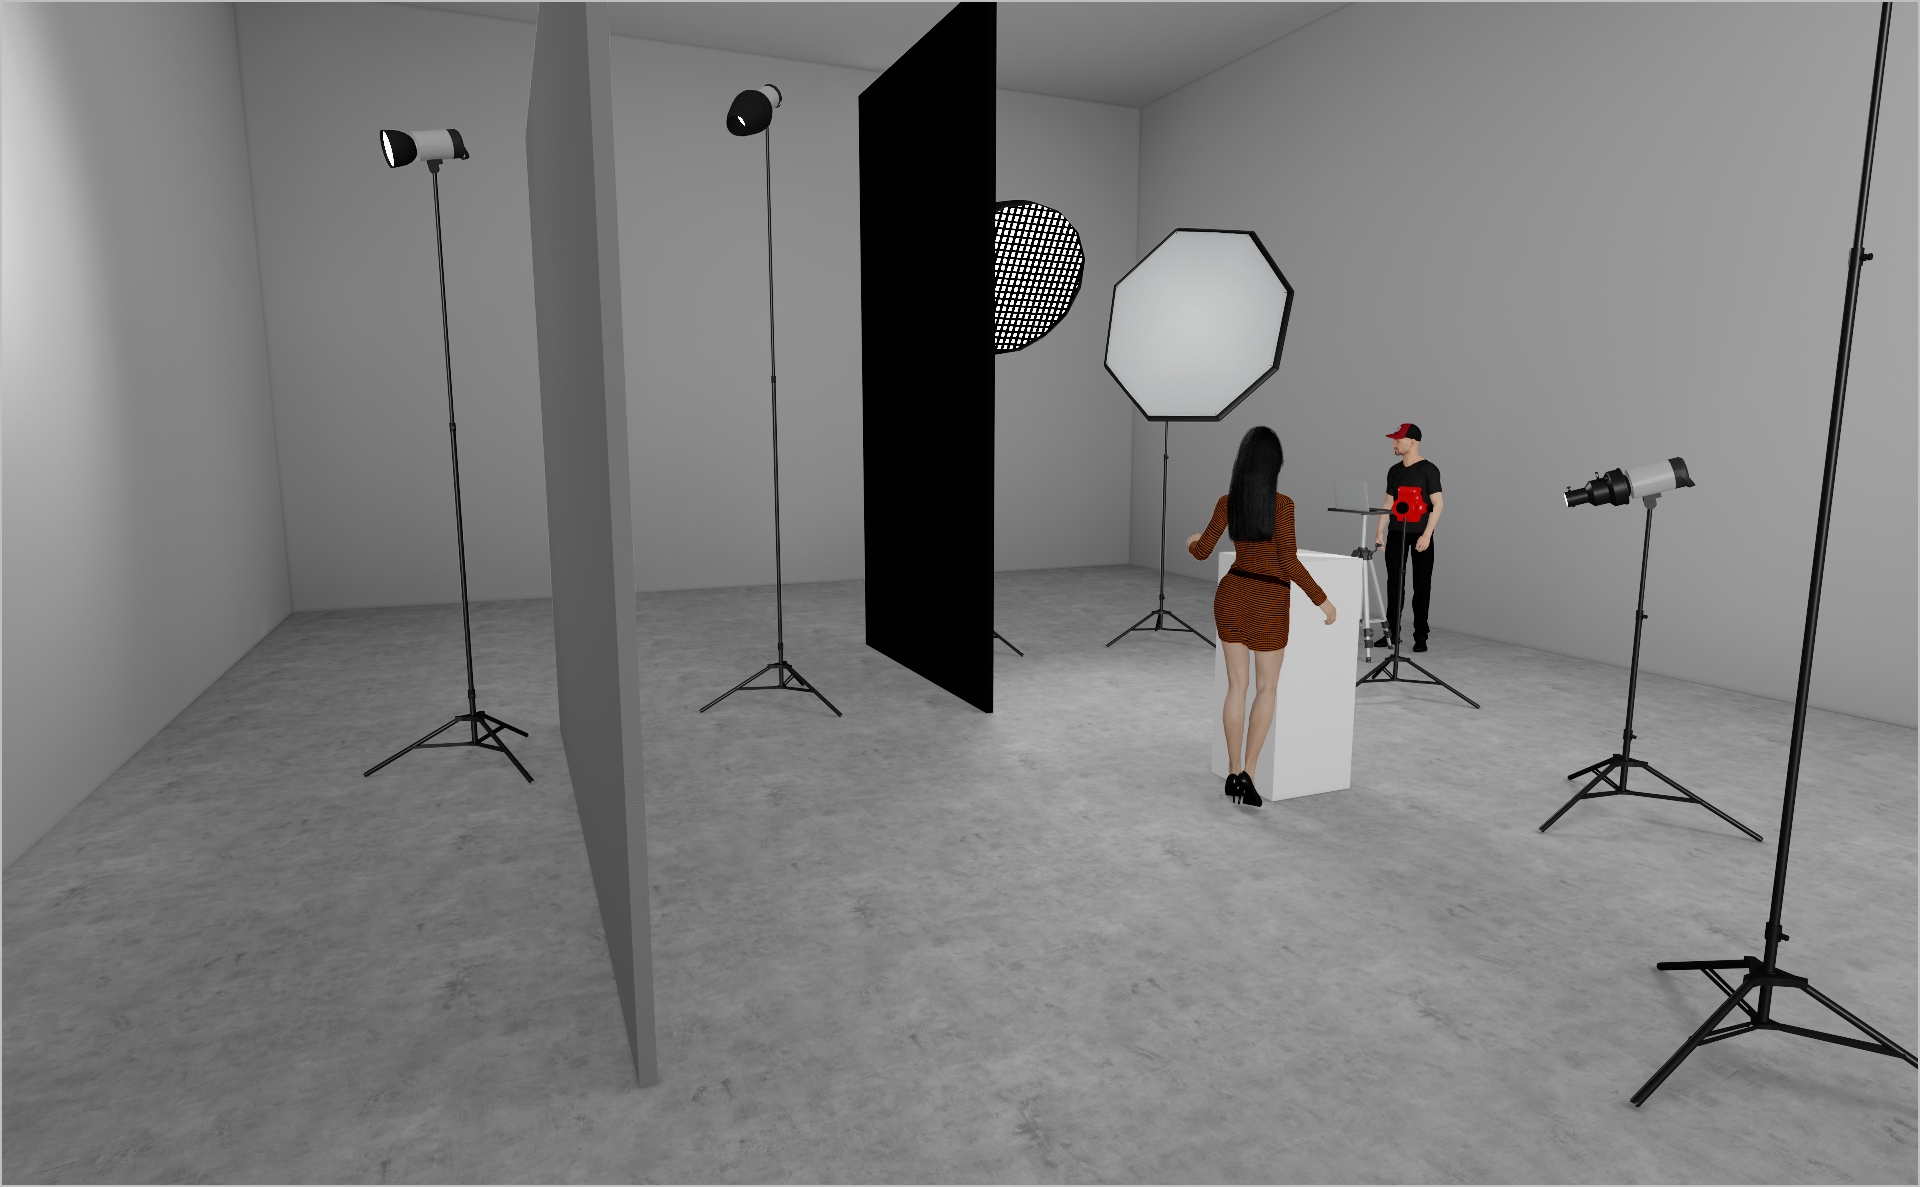
- Mount your key-light, here a Briese Focus 140 on a Profoto ProHead to the model’s right (as shown in the 3D render, slightly hidden by black polyboards). This light is perfect for glossy beauty work.
- Fit a honeycomb grid to the Briese and flag it off with black polyboards or flags to prevent any spill onto the backdrop—without this, your Zoom-reflector effects on the set-build wall will vanish. Start at Power 7.0.
- On the left of the Briese, place a Profoto 5″ Octa RFI to wrap light around the model and fill in shadows. Start at Power 3.0 and tweak as needed.
STEP 4
- Mount a Profoto ProHead with Zoom Reflector on the left side of your set, angling it upward toward the ceiling to serve as base light and lift shadows.
- Adjust placement based on your shooting environment.
- Start at Power 3.0 and tweak to suit the space.
STEP 5
- Add a Profoto Zoom Spot to pinpoint small details—here, the beauty product.
- Mount it on a stand or use handheld by your assistant for flexibility.
- Start at Power 4.0 and adjust to taste.
Credits
- Models Bingbing
- Executive Creative Director: Aurélie de Villeneuve
- Art Directors: Gautier Renault, Armandina Giroto, Jianfeng Zhang
- Agency: Publicis Luxe
- Brand Content: Patricia Lopez
- Lead Production: Salomé Sebagh
- Production house: Prodigious Paris
- Lead Post Production: Marion Perron
- Make-Up: Rafael Pita
- Hair: Deki Kazue
- Styling: Tara Ziegfeld
- Casting: Conan Laurendot
- Set Design: Tristan Tilagone
- 1st Photo Assistant: Jules Martin
- 2nd Photo Assistant: Ugo Reyre
- 3rd Photo Assistant: Joshua Redlinger
- Digi Operator: Antoine Clauzier
- Prada CDO: Remi Poreaux
- Prada Global Brand Content Manager: Aurore Phithamethany
PROJECT DETAILS
CRAFTING THE LIGHT
Project Intro
In this PRADA beauty campaign the main element is the lipstick. The goal of this setup is to create depth and atmosphere within the set and to highlight the product as well as getting a smooth, glowy light on the model.
BEFORE AND AFTER
Transformation made visible.
STEP 1
- Assemble your key set element: position a single wall panel directly behind the model in a corner to introduce depth and layering.
- Use the natural junction of the two walls to guide the eye and create atmosphere.
- This layering technique can be applied to any environment—simply adapt your primary panel or backdrop placement to craft depth in your composition.
STEP 2
- Mount a Profoto ProHead with Zoom Reflector behind the set-build wall to spill subtle light into the left corner. Start at Power 5.0 and adjust.
- Add a Profoto ProHead with Snoot on the right side, aiming at the wall for a smooth light fall-off. Start at Power 5.0.
- Place another Profoto ProHead with Snoot on the left side, pointing at the left wall for an additional depth-enhancing accent. Start at Power 5.0.
STEP 3
- Mount your key-light, here a Briese Focus 140 on a Profoto ProHead to the model’s right (as shown in the 3D render, slightly hidden by black polyboards). This light is perfect for glossy beauty work.
- Fit a honeycomb grid to the Briese and flag it off with black polyboards or flags to prevent any spill onto the backdrop—without this, your Zoom-reflector effects on the set-build wall will vanish. Start at Power 7.0.
- On the left of the Briese, place a Profoto 5″ Octa RFI to wrap light around the model and fill in shadows. Start at Power 3.0 and tweak as needed.
STEP 4
- Mount a Profoto ProHead with Zoom Reflector on the left side of your set, angling it upward toward the ceiling to serve as base light and lift shadows.
- Adjust placement based on your shooting environment.
- Start at Power 3.0 and tweak to suit the space.
STEP 5
- Add a Profoto Zoom Spot to pinpoint small details—here, the beauty product.
- Mount it on a stand or use handheld by your assistant for flexibility.
- Start at Power 4.0 and adjust to taste.
BEFORE AND AFTER
A closer look at professional environments.
TOOLS
Equipment List
Profoto Air Remote
A wireless transmitter that mounts on the camera’s hot shoe to control Profoto lights remotely. Supports TTL, manual power adjustment, and high-speed sync. Why it’s used: Enables precise, cable-free control of flash settings from the camera position, streamlining workflow and allowing quick lighting adjustments during a shoot.

A wireless transmitter that mounts on the camera’s hot shoe to control Profoto lights remotely. Supports TTL, manual power adjustment, and high-speed sync. Why it’s used: Enables precise, cable-free control of flash settings from the camera position, streamlining workflow and allowing quick lighting adjustments during a shoot.
Profoto Pro 11
A top-tier 2400 Ws studio generator offering ultra-fast flash durations, short recycle times, and exceptional color consistency. Features wireless control and AirX connectivity for remote operation.
Why it’s used: Delivers unmatched speed, power, and reliability for high-end fashion, beauty, and commercial shoots where precision and performance are critical.
A top-tier 2400 Ws studio generator offering ultra-fast flash durations, short recycle times, and exceptional color consistency. Features wireless control and AirX connectivity for remote operation.
Why it’s used: Delivers unmatched speed, power, and reliability for high-end fashion, beauty, and commercial shoots where precision and performance are critical.
Profoto ProHead
A high-performance flash head designed for use with Profoto’s Pro-series generators. Built for durability, fast recycling, and consistent color output, even at high power.
Why it’s used: Delivers powerful, reliable lighting for demanding studio and location work, supporting a wide range of Profoto modifiers for maximum creative control.
A high-performance flash head designed for use with Profoto’s Pro-series generators. Built for durability, fast recycling, and consistent color output, even at high power.
Why it’s used: Delivers powerful, reliable lighting for demanding studio and location work, supporting a wide range of Profoto modifiers for maximum creative control.
Profoto Extension Cable
A heavy-duty cable that extends the distance between a Profoto generator and its flash head. Designed to handle high power loads without loss of performance.
Why it’s used: Provides flexibility in light placement on large sets or challenging locations, allowing equipment to be positioned safely and creatively without being limited by generator proximity.
A heavy-duty cable that extends the distance between a Profoto generator and its flash head. Designed to handle high power loads without loss of performance.
Why it’s used: Provides flexibility in light placement on large sets or challenging locations, allowing equipment to be positioned safely and creatively without being limited by generator proximity.
Profoto Zoom Reflector
A versatile hard light modifier for Profoto flash heads, featuring an adjustable zoom function to change the beam spread from wide to focused.
Why it’s used: Provides crisp, punchy light with controllable spread, making it suitable for everything from general illumination to accent lighting in both studio and location work.
A versatile hard light modifier for Profoto flash heads, featuring an adjustable zoom function to change the beam spread from wide to focused.
Why it’s used: Provides crisp, punchy light with controllable spread, making it suitable for everything from general illumination to accent lighting in both studio and location work.
Briese Focus 140 Profoto Mount
A parabolic umbrella-style reflector with a 140 cm diameter, engineered for precise light focus and exceptional wrap. The Profoto mount allows direct use with Profoto flash heads.
Why it’s used: Produces a uniquely crisp yet soft light with beautiful fall-off, ideal for high-end fashion and beauty photography where control, depth, and texture are essential.
Profoto RFI Softbox Octa 5"(150cm)
A large, 150 cm octagonal softbox that produces broad, soft, and even illumination with natural-looking round catchlights. Compatible with Profoto flashes via the RFi speedring.
Why it’s used: Ideal for full-body fashion, group portraits, or beauty work where a flattering, wraparound light and gentle shadow transitions are essential.
Profoto Snoot
A conical light modifier that narrows a flash head’s beam into a tight, focused spot. Easily attaches to Profoto heads for quick setup.
Why it’s used: Creates a concentrated beam for highlighting specific areas, adding accents, or producing dramatic lighting effects with strong contrast and minimal spill.
A conical light modifier that narrows a flash head’s beam into a tight, focused spot. Easily attaches to Profoto heads for quick setup.
Why it’s used: Creates a concentrated beam for highlighting specific areas, adding accents, or producing dramatic lighting effects with strong contrast and minimal spill.
Profoto Zoom Spot
A projection attachment for Profoto flash heads that uses lenses to focus and shape the light beam with precision. Compatible with gobos for pattern projection.
Why it’s used: Allows highly controlled lighting effects, from sharp-edged beams to textured patterns, perfect for adding drama, highlighting details, or creating creative backgrounds in fashion and editorial shoots.
A projection attachment for Profoto flash heads that uses lenses to focus and shape the light beam with precision. Compatible with gobos for pattern projection.
Why it’s used: Allows highly controlled lighting effects, from sharp-edged beams to textured patterns, perfect for adding drama, highlighting details, or creating creative backgrounds in fashion and editorial shoots.
Poly Board Black Large
A large, rigid panel made from black foam core or similar material, used to block or absorb light. Typically lightweight but sturdy enough for repeated use on set.
Why it’s used: Reduces light spill, deepens shadows, and increases contrast by preventing unwanted reflections. Commonly used in pairs to create controlled, moody lighting setups.
A large, rigid panel made from black foam core or similar material, used to block or absorb light. Typically lightweight but sturdy enough for repeated use on set.
Why it’s used: Reduces light spill, deepens shadows, and increases contrast by preventing unwanted reflections. Commonly used in pairs to create controlled, moody lighting setups.
Floppy Flag
A larger black flag with an extra hinged flap of fabric that can be unfolded to double its size. Mounted on a stand or grip arm for flexible light control.
Why it’s used: Offers the same light-blocking function as a standard flag but with extra coverage when needed, making it ideal for blocking strong light sources or creating large shadow areas on set.
A larger black flag with an extra hinged flap of fabric that can be unfolded to double its size. Mounted on a stand or grip arm for flexible light control.
Why it’s used: Offers the same light-blocking function as a standard flag but with extra coverage when needed, making it ideal for blocking strong light sources or creating large shadow areas on set.
Here you´ll find everything to elevate your career
UNLOCKED
Capture One Styles
MEMBER-EXCLUSIVE OFFERING
Mentoring
Rotate your device to see the content